Raquet / Wiki / v1x / Drawing Sprites
Drawing Sprites
Table of Contents
- Loading .PPF Banks
- Creating Palettes
- Loading CHRs from Banks
- Drawing Sprites to the Screen
- Unloading Sprites from Memory
- Palette Swapping
The Raquet graphical system is a bit quirky, not like other game engines, asinine if you will. Raquet's native image format is the .PPF, which is based on the NES CHR file format, and can be created with the (unstable) PPF-Sprite-Editor tool.
The .PPF file format holds an array of 8x8 tiles each with 3 colors, + transparency. To load them into Raquet, you'll need to load the file (also known as a Bank), create a tile, and then arrange your sprite with the tiles you need.
Loading .PPF Banks
To load a sprite, you must first load a .PPF bank into memory. Typically, we call our main .PPF file main.ppf, but you can really name it whatever you want. To load a .PPF into memory, we first need to create a PPF_Bank to store this data, usually named with the ppf_ prefix.
/* PPF Banks */
PPF_Bank ppf_main;
Then we can load a file into this bank. (If you don't know what the & means, don't worry about it.)
Raquet_LoadPPFBank(&ppf_main, Raquet_AbsoluteToAsset("main.ppf"));
Absolute to asset will append the path you put into the parameter to the absolute path of your program's assets folder. This prevents segfaulting and is highly recommended to use.
Creating Palettes
The palette data is hard-coded into Raquet, and can be modified within the Raquet.c file if you don't like our colors. Palettes are stored from 0x00-0x3F, and are addressed with Raquet_GlobalPalette[] with a hexadecimal number within the square brackets addressing the palette value (e.g [0x01] or [0x2F]). To create a palette, we must create an array of 3 values to hold its data.
/* Palettes */
Palette pal_face[3];
If your Palette is a compile-time element, you can initialize it like so:
/* Palettes */
Palette pal_face[3] = { Raquet_GlobalPalette[0x0D], Raquet_GlobalPalette[0x00], Raquet_GlobalPalette[0x20] };
However, if you want to initalize your palette in run-time, you can easily initalize it in a function via the Raquet_SetPalette() function.
// SYNTAX:
// PALETTE ARRAY, 1ST VALUE, 2ND VALUE, 3RD VALUE
Raquet_SetPalette(pal_face, Raquet_GlobalPalette[0x0D], Raquet_GlobalPalette[0x00], Raquet_GlobalPalette[0x20]);
Once you've initialzied your palette, you're now ready to start loading your sprites.
Loading CHRs from Banks
Once we have our .PPF bank loaded, we can now access our CHRs from the file. This is also a very simple process. For both single-tile sprites, and multi-tile sprites, we usually name our variables with the chr_ prefix.
To initialize a sprite, we must first create the variable to hold it.
Raquet_CHR chr_placeface;
To load a sprite into this CHR, there are 2 different methods, each based on your needs.
Loading Single-Tile Sprites
To load a single-tile sprite, we can use the Raquet_LoadCHR() function.
// SYNTAX:
// .PPF BANK, INDEX NUMBER, PALETTE
chr_placeface = Raquet_LoadCHR(ppf_main, 0, pal_face);
We first select which bank we are loading from, and then which tile we want. Tile data is stored from 0 to the end of the file, with 0 being the first tile in the array. After we choose what tile we want, we then pass what palette we want to use for the sprite.
To load the 8th tile in our PPF Bank for example, we would do:
// SYNTAX:
// .PPF BANK, INDEX NUMBER, PALETTE
chr_placeface = Raquet_LoadCHR(ppf_main, 8, pal_face);
Loading Multi-Tile Sprites
Loading a multi-tile sprite is pretty similar to loading a single-tile sprite, but with a few extra steps. First, we need to create an array of what tiles we want to use, sorted by left to right, top to bottom.
int arr_raquetlogo_R[2] = {1, 7};
Then, we can use the Raquet_LoadCHRMult() function, to load our sprite.
// SYNTAX:
// .PPF BANK, INDEXES, WIDTH OF SPRITE IN TILES, HEIGHT OF SPRITE IN TILES, PALETTE
chr_raquetlogo_R = Raquet_LoadCHRMult(ppf_main, arr_raquetlogo_R, 1, 2, pal_logo);
The syntax here is fairly similar to the single-tile function, but with 3 additional variables we need to pass. Our first variable is the same as our single-tile function, but the second requires us to pass the array of indexes instead of one single index. The third and fourth variables are just the width of the sprite in tiles, and the height of the sprite in tiles. This specific sprite is one CHR wide, and 2 CHRs tall, so the values passed are 1, 2. Our last variable is the same as the last variable passed in our single-tile function, being the palette array.
If you want a transparent tile in your array, you can pass -1 and it will be loaded as a blank tile.
For example, lets say you wanted to load this funny guy into your program, assuming each number is the tile ID:
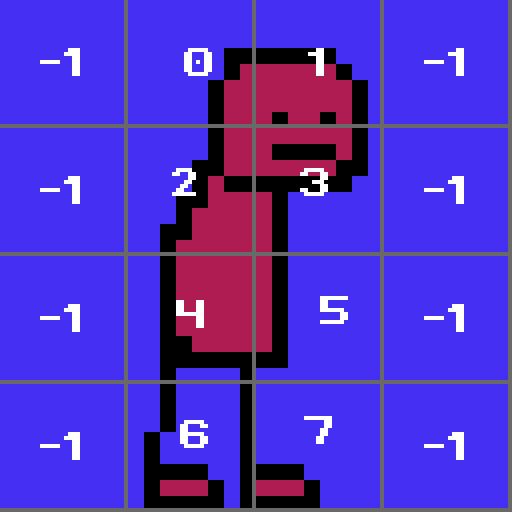
You would write something like the following, keeping mind -1 is a blank tile
Then, we can use the Raquet_LoadCHRMult() function, to load our sprite.
int arr_funnyguy[] = { -1, 0, 1, -1, 2, 3, -1, 4, 5, -1, 6, 7 };
Raquet_CHR chr_funnyguy = Raquet_LoadCHRMult(ppf_main, arr_funnyguy, 4, 4, pal_funnyguy);
Notice how we specify our CHR will be 4x4 tiles, this is important so that Raquet knows how to interpret the array of tiles we gave it.
Drawing Sprites to the Screen
Once we've successfully loaded our sprite into memory, we can draw it to the screen with a simple Raquet_PlaceCHR().
// SYNTAX:
// CHR DATA, X, Y
Raquet_PlaceCHR(chr_placeface, 0, 0);
This will place the CHR we input, in the exact x and y coordinates, onto the screen. In this case, being the top left. We can also use the function Raquet_PlaceCHR_ext() to get more control over how the sprite is displayed
// Origin X and Y
Raquet_Point point_placeface = { 8, 8- };
// SYNTAX:
// CHR DATA, X, Y, WIDTH, HEIGHT, ANGLE, ORIGIN, FLIP
PlaceCHR_ext(chr_placeface, 0, 0, 16, 16, 45, point_placeface, SDL_FLIP_NONE);
The first 2 extra variables here determine the exact width and height, in pixels, of the sprite drawn on screen. We then have the rotation of the sprite, a Raquet_Point that contains the origin of the sprite to be rotated around, and an SDL flip value. In this specific case, the sprite will be drawn as a 16x16 image, rotated 45 degress around its center.
Palette Swapping
To switch a palette of a CHR after it's been loaded, use the Raquet_SwapCHRPalette() function
Raquet_SwapCHRPalette(chr_placeface, pal_face2);
If the palette you want to switch to is the same as the one the sprite is currently using, the function will not execute.